Choosing the Right Lenticular Sheet for Inkjet Printer
by
CG Sheng
Co-founder of ViCGI.com
Update:
There is a shorter version of the lenticular lens FAQs that gives you the key parameters to consider when buying lenticular lenses.
Introduction
In the IT stone age (only about 25 years ago), lenticular printing was done mostly in dark rooms at the film level. Now, with the lowering of prices in computing CPU power, DRAM, graphics software, and printing peripherals, lenticular printing can actually be done at home or in your office. If your interest in lenticular printing is not at the mass production scale, then spending some fun time on Photoshop will let you create an impressive lenticular print.
Since the release of our article 3D Lenticular Printing Interlacing Algorithm Illustrated Using Photoshop, we have received many emails asking the question of where lenticular sheets can be purchased. Years ago we highly recommended Microlens unfortunately it went out of business in April 2021. Company such as Pacur also manufactures lenticular sheets but its focus is to supply to printers in large quantity. ViCGI is now taking the role of Microlens and is selling lenticular sheets to the hobbyists.
Before buying your lenticular sheets, it is always a good idea to know about the specifications. It is the purpose of this article to help you identify the common attributes you will need to be aware of when you choose a lenticular sheet for your small scale DIY lenticular printing projects.
What is a lenticular sheet?
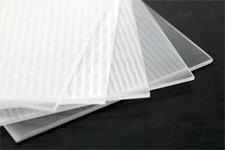
A lenticular sheet is a translucent plastic sheet with a set of small convex lenses on one side and a flat surface on the other side. It is the magic of these small convex lenses that transform a 2D image into a variety of visual illusions. Viewers can see lenticular special effects when the orientation of a lenticular sheet is changed.
Characteristics of a lenticular sheet
Making an eye-catching lenticular print is the combination of good art and science. Choosing the correct lens is just as important as choosing a beautiful scene. Just as with any plastic, lenticular sheets also have a set of specifications for different uses and applications. In general, there are eight parameters that will help you decide the type of sheet you need for your project:
- Material - It is usually made from following material based on the application: Acrylic (PMMA), APET, PETG, Polycarbonate, Polypropylene, PVC and Polystyrene. For a DIY project you should probably choose Acrylic or APET. Acrylic tends to be more expensive than other materials. But since we are not talking about mass projection so the difference in price is not really that much.
- Density of lenses - It is commonly expressed as LPI (Lens or Lines per Inch). Common LPIs are 10, 15, 20, 30, 40, 42, 60, 75, 100, 161, and 200. LPIs for inkjet printing lenticular projects are 60, 40, 30, 15, and 10. The 60 and the 40 is good for letter size prints. The 30 and below are good for larger prints on wide format printers to print posters or POS signs for example.
- Thickness - It is measured in inch or mm which affects the depth of an image ranging from 0.25mm all the way to 6.3mm. The thickness has a reverse correlation with the density of LPI. The lower the LPI the thicker the lenticular sheet will be.
- Viewing Angle - It is a v-shaped region within which lenticular images can be seen clearly. In general, the viewing angle is a guideline to determine the type of effect. A small viewing angle makes the picture very sensitive to change in the sense that a viewer just needs to turn the head slightly a different set of pictures will be seen. For wide angle lenses the viewer can make a relatively bigger head turn to see a different set of pictures so the change is not so sensitive. Because of this fact, narrow viewing angle lenses are good for 3D effects and wide viewing angles lenses are good for dynamic prints such as animation, flip, morph, or zoom.
Because of the manufacturing limitation and the physical properties of materials, thick lenses will have a narrower viewing angle then thin lenses. Also from attribute #3 above it implies that lenses with low LPI will also have low viewing angle and these lenses are therefore better for 3D effects.
-
Viewing Distance - The distance between you and the print is called viewing distance. This is an important factor to consider when choosing a correct lenticular sheet for your application. The number of LPI and the optimal viewing distance are inverse correlated so the higher the LPI, the shorter the optimal viewing distance will be.
Table 1: Summary on LPI, View Angle and View Distance:
| LPI |
10 |
15 |
20 |
30 |
40 |
60 |
75 |
100 |
| View Angle |
48 |
47 |
47 |
49 |
49 |
54 |
49 |
42 |
| View Distance |
10’ - 50’ |
5’ - 20’ |
5’ - 20’ |
3’ - 15’ |
1’ - 15’ |
1’ - 10’ |
6” - 3’ |
6” - 10” |
- Transparency - The higher the transparency the clearer and better the visual effect. It should have a minimum transmittance rate of 85%.
- Durability and Stability - Different material has its sensitivity to termperature and UV light. Some materials are good for indoors only and some are good for both indoors and outdoors.
| Material |
Acrylic |
APET |
PETG |
Polycarbonate |
Polypropylene |
PVC |
PS |
| Indoor |
|
X |
X |
|
|
|
|
| Indoor/Outdoor |
X |
|
|
X |
X |
X |
X |
-
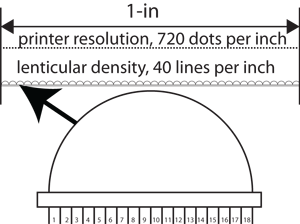
Printer/lens resolutions divisibility - While HP and Canon printers have resolutions in multiples of 600 DPI (Dots Per Inch), Epson is in the 720 DPI scale. These numbers limit your choice of lenticular sheet. Simple math will show you why.
Let us use Epson's 720 as an example. In one inch the Epson printer can print 720 dots. If you choose a lenticular sheet with 40 LPI, then 720 / 40 = 18, meaning under each lenticule there should be 18 dots. Since 720 is perfectly divisible by 40 so we get a whole number 18. But if you choose lenticular sheet with 42 LPI the quotient will be 17 and the remainder will be 6. That means there will still be 18 dots below each lenticule but the last dot will be partially on the first lenticule and partially on the next lenticule. As you can imaging, for the next 40 lenticules the picture under each lenticule will be totally off. The wrong pattern repeats after every 42 lenticules Because of this the intended effect will be either ruined or diminish.
Summary
For small inkjet projects, choose a lenticular sheet with 60 LPI or below. Also choose an LPI that is a factor of the printer's horizontal resolution. Since 60, 50, 40, 30, 20, 15, and 10 LPI are all factors of 600 so they all work for HP and Cannon printers. For Epson printers, use 60, 40, 30, 20, 15, and 10 LPI instead.

