Traditionally, creating a 3D lenticular print required a "multi-view" capture—taking a sequence of photographs along a sliding rail. However, environmental constraints often make this impossible. For decades, the lenticular industry has sought to perfect the art of 2D to 3D conversion: the process of taking a single flat image and mathematically re-calculating the depth information.
While modern AI-driven depth mapping has simplified the "layering" process, the underlying geometry of parallax remains constant. This paper outlines a systematic theory for converting flat images into 3D using the basic functions of Adobe Photoshop (CC/CS versions) and the principles of trigonometry.
Lenticular printing works by delivering two distinct sets of visual information—one to the left eye and one to the right—simultaneously. This emulates binocular disparity, the primary way the human brain perceives depth.
When you look at an object, your eyes see it from slightly different angles. By calculating the "shift" (parallax) between these two views and interlacing them under a lenticular lens, we can trick the brain into perceiving a 3D scene on a 2D surface.
The goal of conversion is to take a flat image and "reverse-engineer" the spatial relationships.
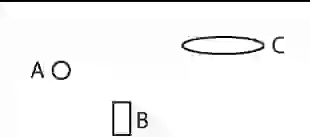
Figure 1: Spatial relationship of 3D objects
Figure 1 shows the plane view of three objects in different locations. Once this view is captured by a 2D camera, all the depth of field information will be lost and you will notice these three objects appear to be on the same plane as shown in Figure 2.

Figure 2: 2D picture loses depth information
The linchpin of converting a 2D picture to a 3D picture is the reverse process that converts the image in Figure 2 back to the image in Figure 1.
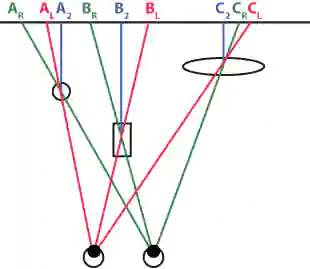
Figure 3: Binocular shift of objects
In Figure 3, A2, B2, and C2 are the original positions of objects A, B, and C in the 2D picture. In order to create spatial depth, the left eye needs to see objects A, B, and C at position AL, BL, and CL. Similarly, the right eye should see them at positions AR, BR, and CR. When the objects are layered with Photoshop it is easy to create a left-eye picture and a right-eye picture as shown in Figure 4.
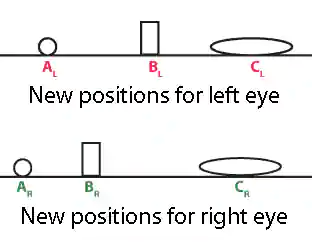
Figure 4: New positions of objects
The key of the process is identifying where objects should sit in 3D space. To do this, we must define three zones:
A focal plane is a plane where there is no parallax, i.e. the left and the right eyes are seeing the same objects on this plane. One can actually set the focal plane anywhere along the axis perpendicular to the picture surface. For example for the three objects in Figure 1 and Figure 3, if the focal plane is set at the same position as object A, then object B will seem to pop out of the picture and object C will seem to be set further into the picture leaving object A to appear as if it is on the lenticular print itself.
You can download the asset files for this exercise from our 2D to 3D Conversion (34.3 MB) archive.

Figure 5: A 2D picture to be converted
Figure 5 is a picture obtained from Google image by searching the keyword "US Open." The picture has a very clear foreground (the net), middle-ground (the tennis player), and background (everything else). To enhance the 3D effect a tennis ball is added to the picture as shown below. The size of the tennis ball is deliberately magnified to exaggerate the effect that the ball is just right in front of the viewer’s eyes. The position of the ball should be somewhere before the net and in-line with the player’s eye sight.
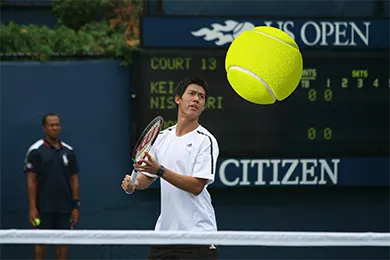
Figure 6: Adding object to the original 2D picture
For this exercise, let’s plan to set the focal plane on the tennis player, hence the net and the tennis ball will be in the foreground giving the viewer the “popping out” impression. On the other hand, the background will recess into the picture.
Now, let’s open the picture in Photoshop and set the Resolution to 720 dpi if you intend to use an Epson printer. If you plan to use HP or Canon printer, set the Resolution to 600 dpi instead. Set the width to 12 inches. We will explain these settings later.
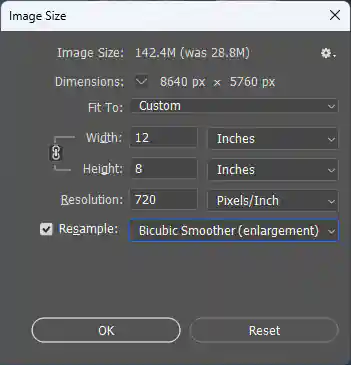
Figure 7 - Setting of image size
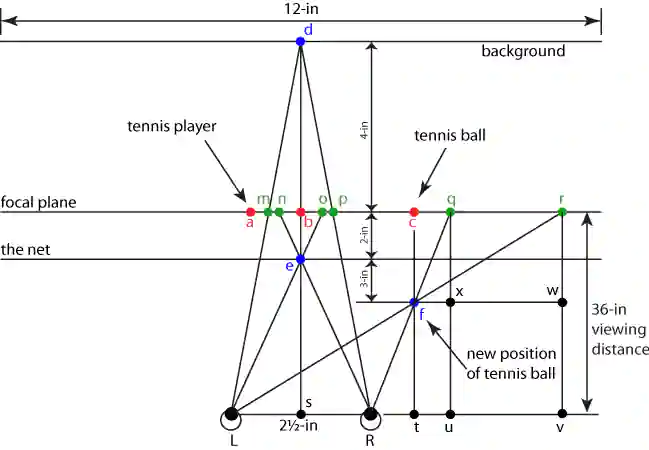
Figure 8 - Schematic for parallax planning
Figure 8 is used to determine the amount of parallax. Please do not be intimidated by the complexity of the drawing. Once explained, it will become obvious. We also suggest that you print out this drawing for reference so you do not have to scroll up and down.
On the drawing point “a” is the original position of the tennis player and point “b” is the original position of the net and the background. The net and the background span across the entire picture so the mid-point of the picture is considered as their positions. Point “c” is the original position of the tennis ball.
If we are going to use the 40 LPI lenticular sheet, the specifications suggest the viewing distance be 3 feet, i.e. 36-in. The width of the picture is 12-in as we have set.
Since we choose to use the layer of the tennis player as the focal plane, we can ignore point “a” from now on as it already lies on the focal plane.
The tennis ball will be moved from point “c” to point “f”, 5 inches in front of the focal plane. Because of this move, the left eye should see the tennis ball at point “r”, and the right eye should see it at point “g”.
The net will be moved from point “b” to point “e”, 2 inches in front of the focal plane. Again, the left eye should see it at point “o”, and the right eye should see it at point “n”.
Similarly, the background will be moved from point “b” to point “d”, 4 inches behind the focal plane. To account for this move, the left eye should see it at point “m”, and the right eye should see it at point “p”.
The table below summarizes the descriptions above
| Object | Original position | New position for left eye | New position for right eye |
| Tennis ball | c | r | g |
| The net | b | o | n |
| Tennis player | a | - | - |
| The background | b | m | p |
Now we need to use our knowledge of geometry and trigonometry to find out the necessary shifts. Let’s work out the details on the tennis ball. The net and the background are less tedious and can be calculated by the properties of similar triangles.
The original position of the tennis ball is at point “c”. From Photoshop we know that its x coordinate is 5850.5 pixels from the left, or 8.126 inches if we divide it by 720 dpi.
Since point “b” is at the center of a 12 inch wide picture therefore the length of line “bc” should be 8.126 – 6 = 2.126 inch, and Lt = bc + Ls (half distance between left and right eyes) = (2.126 + 1.25)
Now to find the shift for “cr”.
Since △rfw ~ △fLt,
$$ ∴ \frac{fw}{rw} = \frac{Lt}{ft} ⇒ fw = \frac{Lt.rw}{ft} = \frac{5(2.126+1.25)}{36-2-3} = 0.545\; or\;392\;pixels $$Similarly, for the right eye, we need to find the shift for “cq”.
Since △qfx ~ △fRt,
$$ ∴ \frac{fx}{qx} = \frac{Rt}{ft} ⇒ fx = \frac{Rt.qx}{ft} = \frac{5(2.126-1.25)}{36-2-3} = 0.141\; or\;102\;pixels $$The following table summarizes all the necessary shifts which include the shift for the net and also the shift for the background.
| Object | Original position | New position for left eye | New position for right eye |
| Tennis ball | c | cr=392 pixels | cg = 102 pixels |
| The net | b | bo = 53 pixels | bn = -53 pixels |
| Tennis player | a | - | - |
| The background | b | bm = -90 pixel | bp = 90 pixels |
Using the above table as a guide, we can come up with two new pictures; one for the left eye and one for the right eye as shown below.
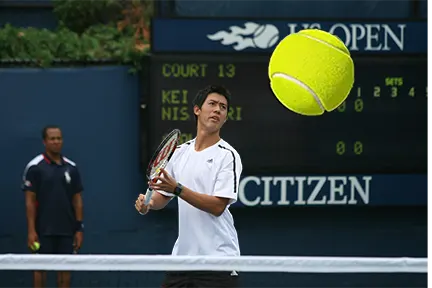
Figure 9 - Picture for left eye
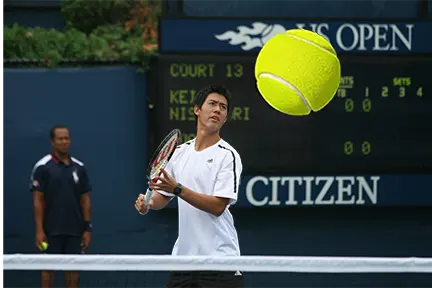
Figure 10 - Picture for right eye
If you observe carefully, you will see a slight difference between the above two pictures.
To see how it works out, the simplest way is to make an anaglyph picture. This can be done relatively easily.
Use Photoshop to open the right picture first then follow by opening the left picture. Copy and paste the left picture on top of the right picture. Double-click the layer property of the left picture and then disable the [G] and [B] checkboxes under the [Advanced Blending] section. Now you can view the result in the following picture (picture with some red tint) with a pair of red-cyan glasses.
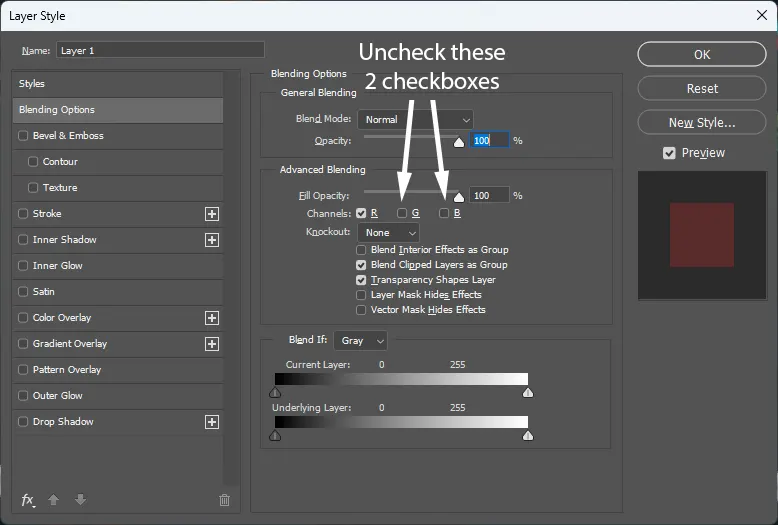
Figure 11 - Setting for creating an anaglyph
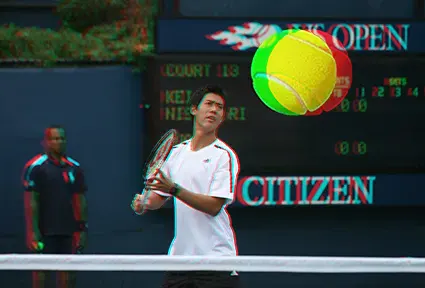
Figure 12 - Anaglyph
We just created an anaglyph by combining a picture that is for the left eye and a picture that is for the right eye. Now it is time to slice these pictures to match them up with the lenticular sheet. Remember we set the resolution of the picture to 720 dpi (or 600 dpi if you use HP or Cannon printer)? Now let us explain why.
Since an Epson printer can print 720 dots per inch, we want to map each dot the printer prints to a single pixel on the image file. This is why we need to set the image resolution to the resolution of the printer, i.e. 720 for Epson and 600 for HP and Canon.
Another number we need to know is how many dots will be under each lenticule. We will continue to use the 40 LPI lenticular sheet as an example. Since 720 divided by 40 equals 18, there will be 18 dots under each lenticule. There are several ways we can arrange these dots, all with the purpose of alternating the dots from the left and right picture. For example, we can arrange the first 9 dots from the left (9L), and the next 9 dots from the right (9R). Alternatively we can have 3L3R3L3R3L3R because this pattern can be repeated and the sum of dots also equals to 18. 2L2R2L2R2L2R2L2R2L won’t work because the pattern cannot be repeated to the next lenticule although the sum is still 18.
Let’s use the simpler pattern 9L9R in the following interlacing example.
To accomplish this, all we need to do is to create a mask for the top layer (the layer for the left eye). The mask will contain vertical stripes of 9 pixels wide and 9 pixels apart. We can create and define a pattern with 9 black pixels, and 9 empty pixels. When fill the mask with the Paint Bucket Tool, the image will be interlaced as we intended.
Let’s outline the steps below.
Step 1: Create a new document 18 pixels wide, and 1 pixel tall.
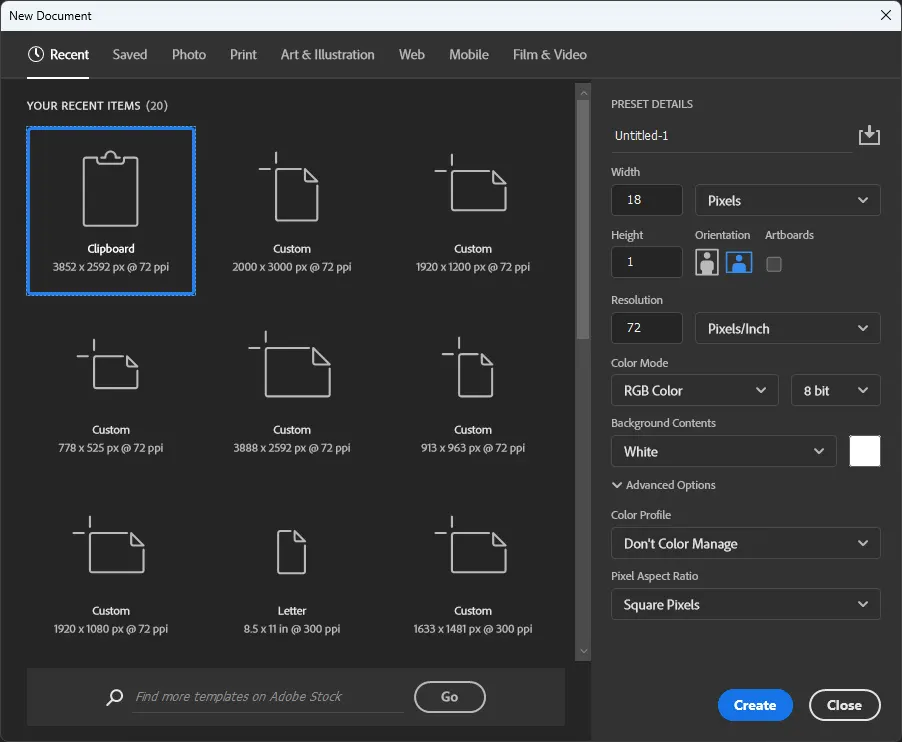
Figure 13 - Create a new document for mask pattern
Step 2: Create a 9 black pixels and 9 empty pixels patten
![]() >
>
Figure 14 - Create a pattern for mask
Step 3: Select all pixels and define it as a pattern
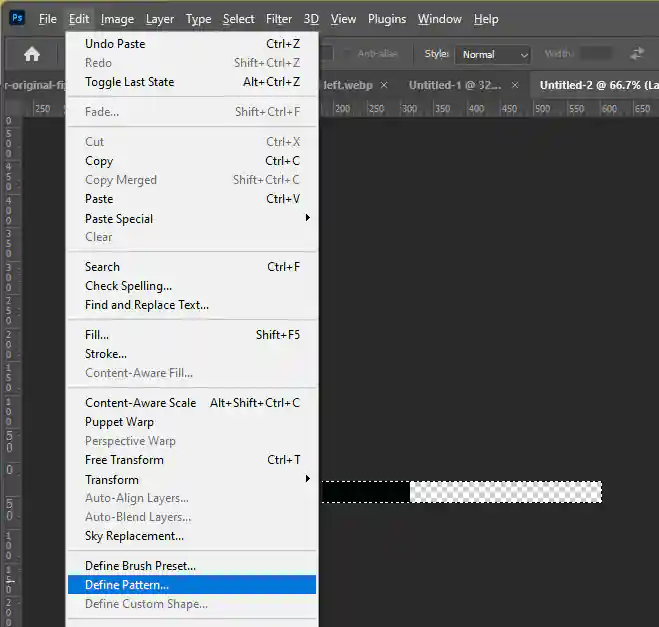
Figure 15 - Define a pattern
Step 4: Create a mask for the top layer.
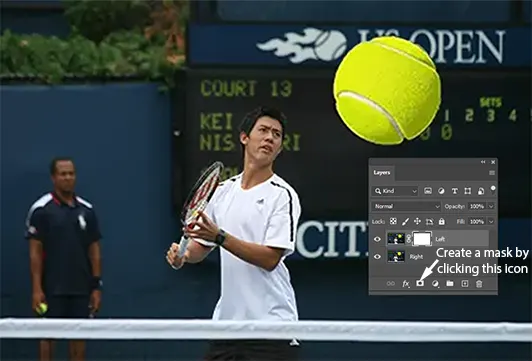
Figure 16 - Create a mask for the top layer
Step 5: Choose the Paint Bucket Tool from the toolbar
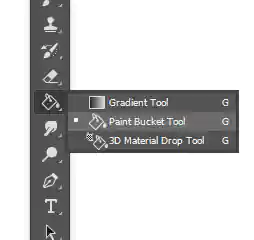
Figure 17 - Choose the Paint Bucket Tool
Step 6: Choose "Pattern" from the Paint Bucket Tool option pulldown
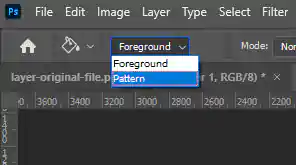
Figure 18 - Choose Pattern from the pulldown menu
Step 7: Fill the top layer mask with the pattern
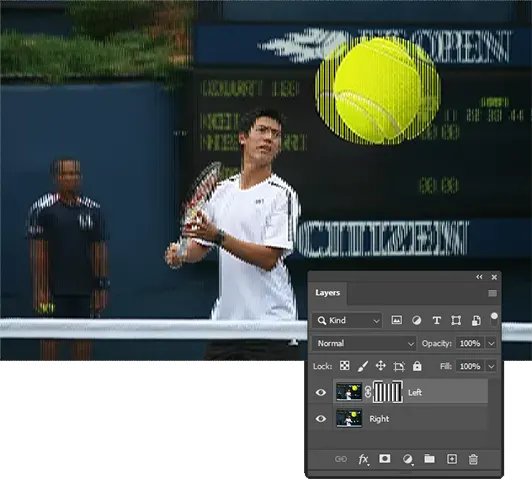
Figure 19 - Fill the mask with pattern
Step 8: Flatten the image, and print it at 720 dpi on a photo glossy paper.
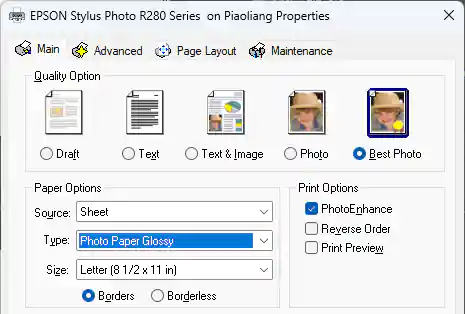
Figure 20 - Epson 720 setting
Step 9: Put the lenticular lens over the printout and align them to obtain the clearest picture.
Step 10: Laminate the lenticular sheet to the printout by using the double-sided adhesive sheet.
If the steps above are too detailed for you to follow, then try to understand the principle behind the 2D to 3D image conversion. By understanding the principle, you can draw your own diagram, map out the necessary shift for each object, and experiment with the effect by using the anaglyph diagram. The steps described above are part of a tutorial so that you can try them out yourself. The values in your calculation can be quite different depending on the objects and the complexity of the picture you are using.
The main point is that we need to create a picture for the left eye and a slightly different picture for the right eye in order to create proper depth amongst all the objects in the picture. If this is our goal, we can use Photoshop to move the objects left and right to achieve this goal. With this in mind, here is a high-level set of steps for any 2D to 3D image conversion project for lenticular printing.
By mastering these geometric principles, you move from "guessing" the 3D effect to engineering a precise, immersive visual experience.